My friend Tracy Hildebrand is a former art teacher who volunteers at her daughter’s preschool teaching art projects.
When she told me about a paper making project she did with the kids that sounded easy and fun, I asked Tracy to share how she did it.
Here’s her tutorial ::
Paper Making for Kids
A Handmade Paper Shapes Tutorial
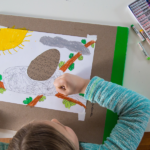
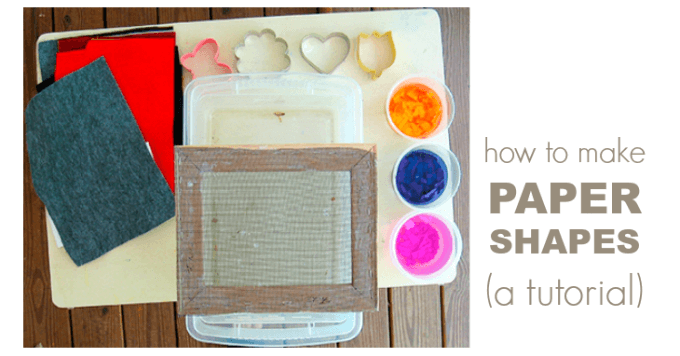
MATERIALS
- Paper to recycle
- Plastic containers to soak paper
- Cookie cutters (we used heart, butterfly and flower shapes)
- Frame with fine mesh screen stretched tightly across and affixed with staples or tacks
- Large container to catch water (this should be the proper size to hold frame and allow water to seep through)
- Old but working blender (there is the chance of burning out the motor if you are making a large quantity, so don’t use your good blender. we used one from the thrift store.)
- 9×12 pieces of nylon felt
- Newspaper
- Glitter (optional)
1. Tear paper into nickel-sized pieces and put in plastic container filled halfway with water. Soak for at least 24 hours. If you are using colored paper, you may want to separate your colors into different containers, or put similar colors together. We used yellow/orange, blue/purple, and pink.
2. Add about a half-cup of torn paper to your blender with about a cup of water. Add glitter if desired. Process until paper breaks up into a pulp
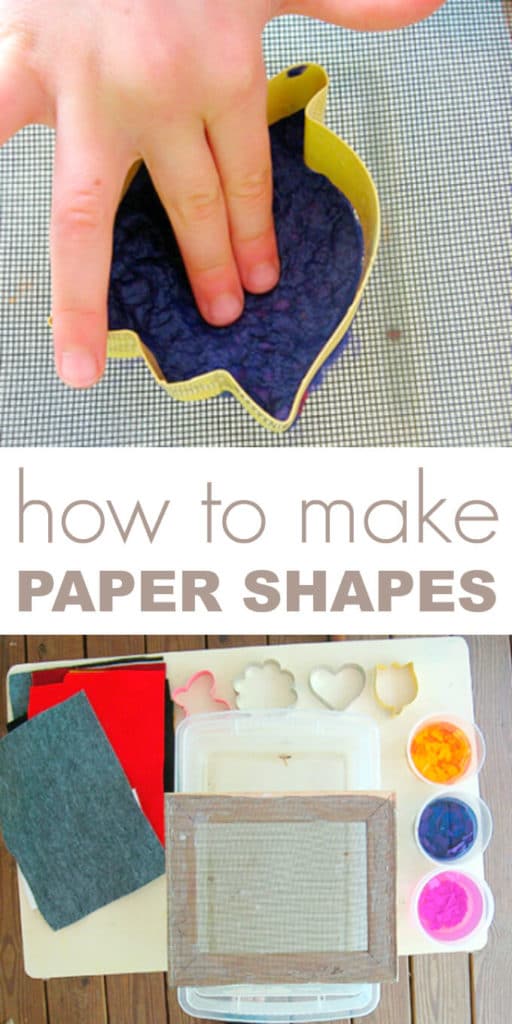
3. Position your frame screen across the large water container and place the cookie cutter on top of the screen.
4. Pour paper pulp into cookie cutter, making sure to get pulp into all areas of the shape. Wait a few minutes allowing water to drip through.
5. Using your fingers, carefully tamp down on pulp to squeeze more water through the screen.
6. Carefully lift the cookie cutter, allowing your paper to remain on the screen. Lay a piece of felt on top and gently press with the palm of your hand to soak up as much moisture as you can.
7. Gently lift your paper from the screen and lay on newspaper to dry.
8. You can use your finished paper shapes as ornaments or to decorate cards. If you want to write on them, permanent felt tip pens work best (ballpoint and rollerball pens dig into the surface too much).
You can even incorporate seeds to make seed paper shapes!
How about you? Have you tried paper making with kids?
Thanks for the tutorial, Tracy!
Pin It for Later
11 Comments
Jody
May 20, 2008 at 7:26 amWe just did a similar project at our home. One addition, we added seeds to the pulp after it was blended so, the seeds are imbedded in the paper. We made sheets of paper and used a cookie cutter to cut out shapes after it dried. We planted the paper and now we are waiting to see if flowers grow from our planted paper. My mother-in-law gave them as gifts to the women at her book club and they were a hit.
Quinne
May 20, 2008 at 11:22 amHi Jean :) thanks for sharing this!
Tracy, what a fun idea! And I like Jody’s idea of adding seeds to the mix. That would make a fun project for a “springtime” party!
Blessings, Q
Christina
May 20, 2008 at 2:12 pmWhat a fantastic tutorial. I’ve seen this idea floating around the internet, but this tutorial makes it very accessible for kidlets. Thanks!
The Artful Parent
May 20, 2008 at 10:47 amWhat a great idea! I bet those would make wonderful gifts. -Jean
Anna
May 20, 2008 at 6:53 pmThis looks like great fun! Fabulous how-to pics!
Julie La Framboise
May 22, 2008 at 6:52 amHi Jean-
I have been enjoying your website.Thank you for sharing your wonderful ideas. I didn’t know how to contact you, but my Barefoot Books website has expired. So you might want to change it back to the original link. Thank you for letting me link up, but I have decided to let Barefoot go.
Thanks-
Julie La Framboise
Allison
May 22, 2008 at 7:31 pmI did this project with my nephew about…oh……4 or 5 years ago, and he’s an 8-year-old now and still talks about it! He’s a crafty guy, his mama not so much, so I get to help him with fun projects. I’ve been pleased that he remembers them. he definitely liked these shapes.
Evan Derrick
May 28, 2008 at 7:58 amThis is really neat! It’s amazing what you can do with shredded paper. Thanks for sharing!
amy
June 3, 2008 at 12:20 pmWe did this in one of my art workshops for elementary kids and it was a huge hit!!! I love this type of project! xo
Heather
June 11, 2008 at 12:48 pmWhat a fabulous tutorial! I’m looking for some crafts to do at a “fun day” this summer–any idea how long these would need to dry in the sun?
Inspiration: Whimsical Wednesdays Rhubarbsky
May 30, 2009 at 7:08 pm[…] an idea I found in Scribble Art by Mary Ann Kohl) Fairy Rings Monoprinting Make Homemade Pretzels Handmade Paper Shapes Make Lip Balm Nature Prints in Sculpey Make a Sundial Shadow Play Put the bird house and bird […]