Have a kid who loves to draw? Check out our NEW Drawing Skills Master Class!  Designed for kids 6-11 to gain skills and confidence.

How to Make a Cardboard Castle for Hours of Pretend Play

by Jean Van't Hul
May 22, 2018
1.1K Shares

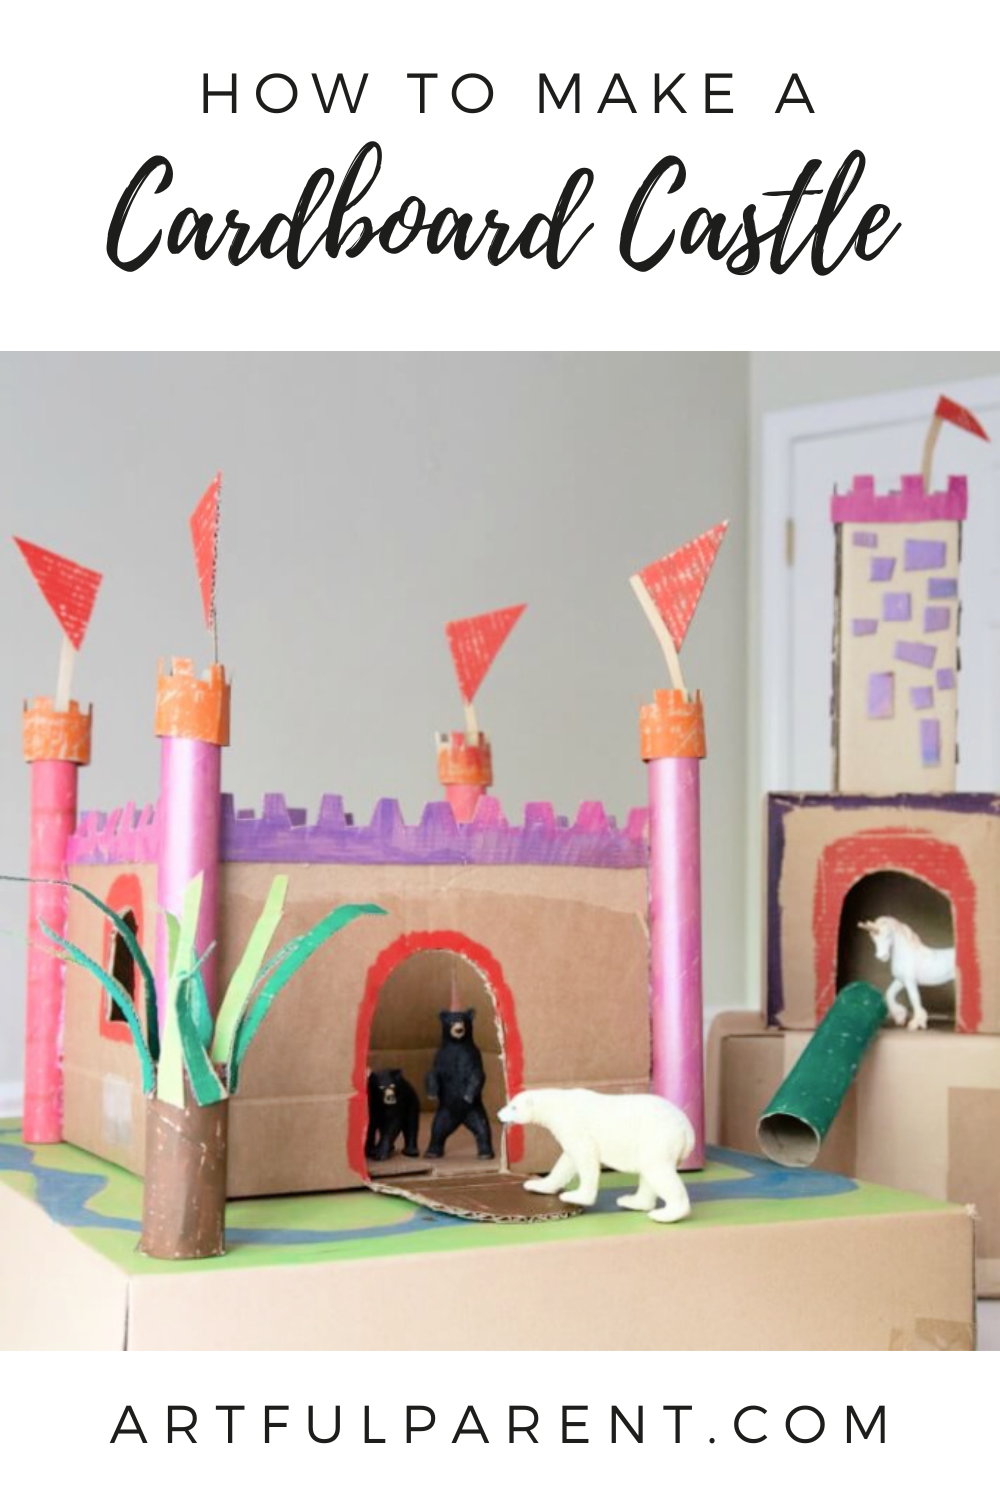
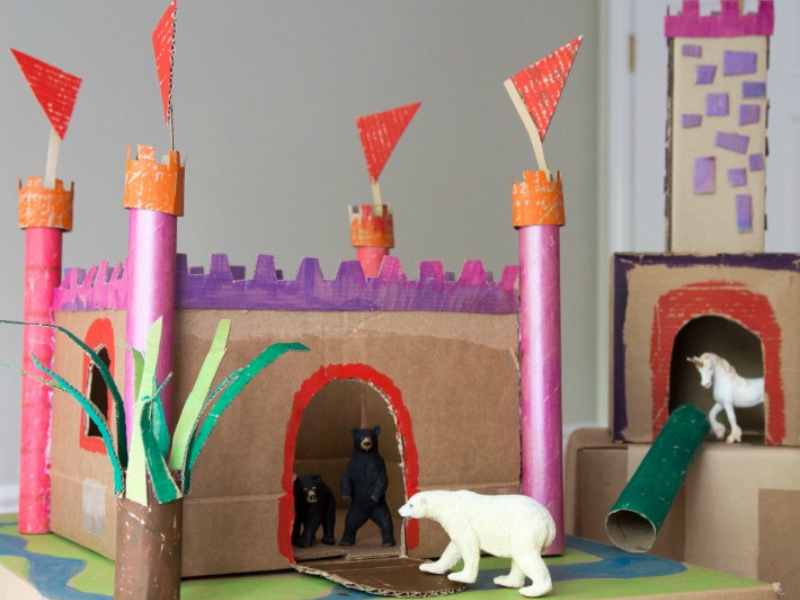
Here’s how to make a cardboard castle for kids’ pretend play QUICKER and EASIER than you thought possible. You’ll want a cardboard box, cardboard tubes, a glue gun, and some paint sticks. Post sponsored by Kwik Stix.

This post contains affiliate links.

How to Make a Cardboard Castle (the short version)

  1. Save your cardboard boxes.
  2. Fire up the glue gun.
  3. Open a package of Kwik Stix.

A big thanks to Kwik Stix for sponsoring this post! As always, all opinions expressed are my own.

When Daphne and her friend Emily had a day off of school, they fully intended to spend the day outside on their scooters. Instead, they were forced to spend it indoors due to pounding rain. In anticipation of a long day and the need of an engaging activity, I got out the cardboard boxes, glue guns, and Kwik Stix.

Kwik Stix Paint Sticks Up Close

You can find Kwik Stix at Walgreens, at Michaels (both in stores and online), online at Target, and online on Amazon.

They built a castle, a playground/garden, a hospital + stretcher, and some houses.

They were so into it that they spent the entire day working on it and playing with it. (Except for a brief umbrella fort in the rain, some caterpillar rescuing (hence the cardboard hospital and stretcher, and helping to shape and cook soft pretzels.)

Want to make your own cardboard castle for pretend play? Or a house, a barn, a tower, a ?

Here are some tips and instructions to get you started.

How to Make a Cardboard Castle - A Simple Kids Craft to Make from a Cardboard Box

How to Make a Cardboard Castle

(Feel free to adapt these instructions for other buildings!)

MATERIALS

  • Cardboard box
  • Cardboard tubes
  • More cardboard (such as the flaps from the above box)
  • Scissors
  • Utility knife (adult use only)
  • Kwik Stix paint sticks Kwik Stix 12 pack *
  • Glue gun**
  • Marker

A quick note about the Kwik Stix and glue guns:

*Kwik Stix are tempera paint in mess-free stick form. They glide on smoothly, dry within 90 seconds, are smudge free, fill large areas quickly, and work well with other art supplies and on various surfaces. Plus the colors are vibrant. If you haven’t tried them yet, I highly recommend that you do!

You can find Kwik Stix at Walgreens, at Michaels (both in stores and online)online at Target, and online on Amazon.

**Glue guns make cardboard construction much easier and faster and so I definitely recommend using one for this project. My kids have long used glue guns, and yes, there is the occasional minor burn, but it feels worth it to be able to build 3D so efficiently.

Cordless Glue Gun - Charging

Glue Gun Tips

  1. Talk about safety before you start working
  2. Keep a bowl of ice water handy
  3. Consider a cordless glue gun

The glue gun pictured above is actually a mini cordless glue gun with a stand that I picked up at AC Moore for about 9 bucks. There is a cord in the picture but it was just for charging it. Once it was charged, we could unplug it and bring it to the table with us. The combination of no cord to deal with and having a stand made it feel safer for the kids to use.

Of course, if your child is too young or doesn’t feel comfortable working with a glue gun, you can do the gluing part yourself.

Daphne coloring the cardboard castle with paint sticks

INSTRUCTIONS

  1. Cut out doors and windows

    First, have the child draw the doors and windows on the box with a marker. Then, (adult job) use the utility knife to cut along their lines to cut out the doors and windows.

    Note: If you want a drawbridge, keep the door attached at the bottom. You can even add string at each side for the authentic drawbridge look.

    You can do this part all at the beginning if you like. Or, if you’re like us, you cut out some doors and windows, work on your castle a bit, and then realize you need some more windows. It’s all good.

    Drawing Windows and Doors onto Cardboard Castle

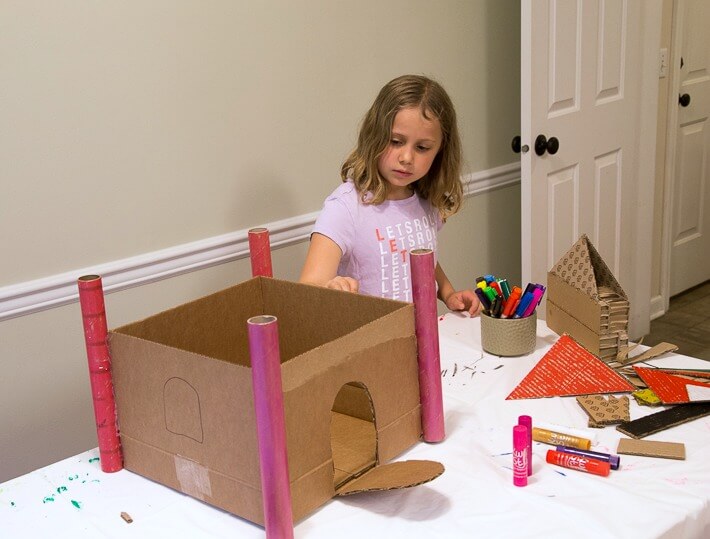
  2. Color your cardboard castle

    Use the Kwik Stix paint sticks to color and decorate your cardboard castle box as well as the cardboard tubes and additional cardboard pieces.

    The Kwik Stix dry super fast (90 seconds!) so there’s no waiting around for paint to dry.

    Coloring cardboard castle with paint sticks

    Simply color your cardboard pieces with the paint sticks and they’re ready to assemble and play with.

    You can, of course, use regular tempera paint to paint your cardboard castle. We’ve done it and it works. But the paint sticks make the whole process much quicker and less messy!

    Coloring Cardboard with Kwik Stix Paint Sticks

  3. Glue on the towers

    Glue the colored towers to the corners of the castle box using the glue gun.

    Using the glue gun to make the cardboard castle

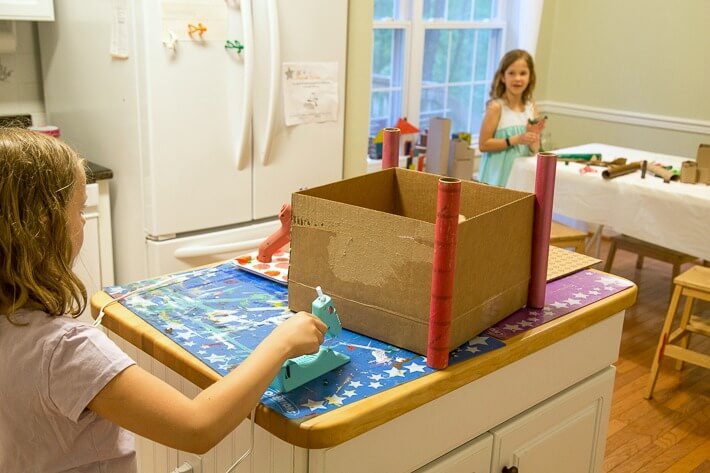
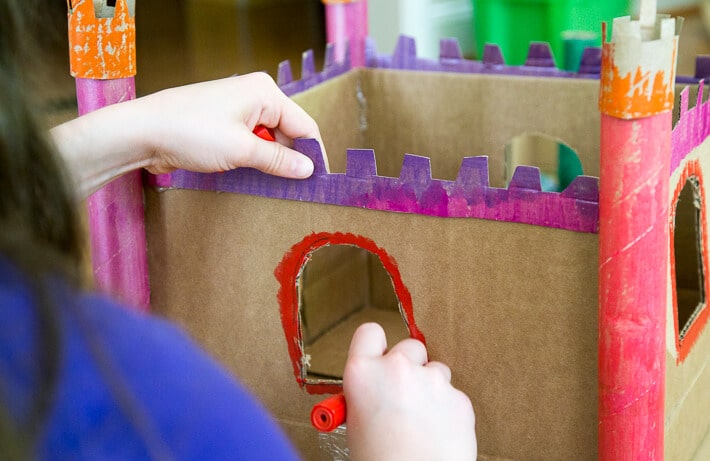
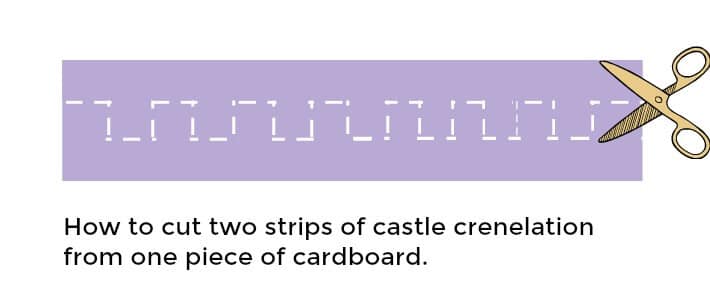
  4. Create castle crenelations

    Use scissors to cut two strips of crenelation out of a one strip of colored cardboard. Kind of like cutting zig-zag down the center of the cardboard strip, only instead of zig-zag, cut the u0022teethu0022 of the crenelation.

    How to cut two strips of castle crenelation from one piece of cardboard

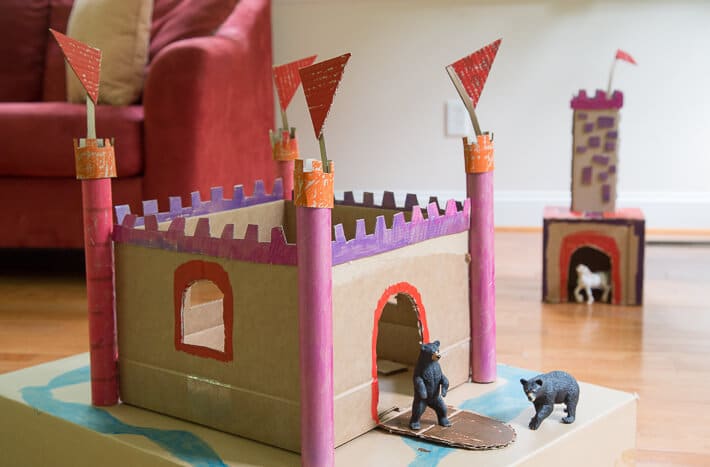
    Glue strips of castle crenelation along the top sides of the castle.
    Cut crenelated pieces out of colored toilet paper rolls and glue them onto the tops of the towers.


  5. Add castle details

    Add more castle details such as flags, stonework, moats, towers, trees, ramps, gardens, and/or furniture.

  6. Play!

    Play with your new cardboard castle!

    The kids playing with their cardboard castles

    Bring in the animal and people figurines for pretend play.

    Playing with cardboard castles and animal figurines

    Or, you know, your beloved caterpillars, if that’s what needs a castle at the moment.

    Kids jar of caterpillars with cardboard tree

Daphne and Emily even made a cardboard hospital and stretcher for a couple of caterpillars that they rescued from the rainstorm.

You could follow the steps here by the letter, or you could do it more like we did it, which is build some, play some, color some. Add more details, windows, color, etc, then play some more.

This open-ended approach works especially well with the Kwik Stix paint sticks because they dry almost immediately.

Daphne Making a Cardboard Hospital

More Cardboard Castles, Doll Houses, and Play Mats

Note: We’ve used paint sticks for the DIY play mats (awesome!), but they would work for any of these other pretend play structures as well.

Pin It for Later

Here's how to make a cardboard castle for kids' pretend play QUICKER and EASIER than you thought possible. You'll want a cardboard box, cardboard tubes, a glue gun, and some paint sticks. That's all! #cardboard #craftsforkids #dollhouse #kidscrafts #play #playroom

Leave a Reply

Your email address will not be published. Required fields are marked *

1.1K Shares
Print
Share
Pin1.1K